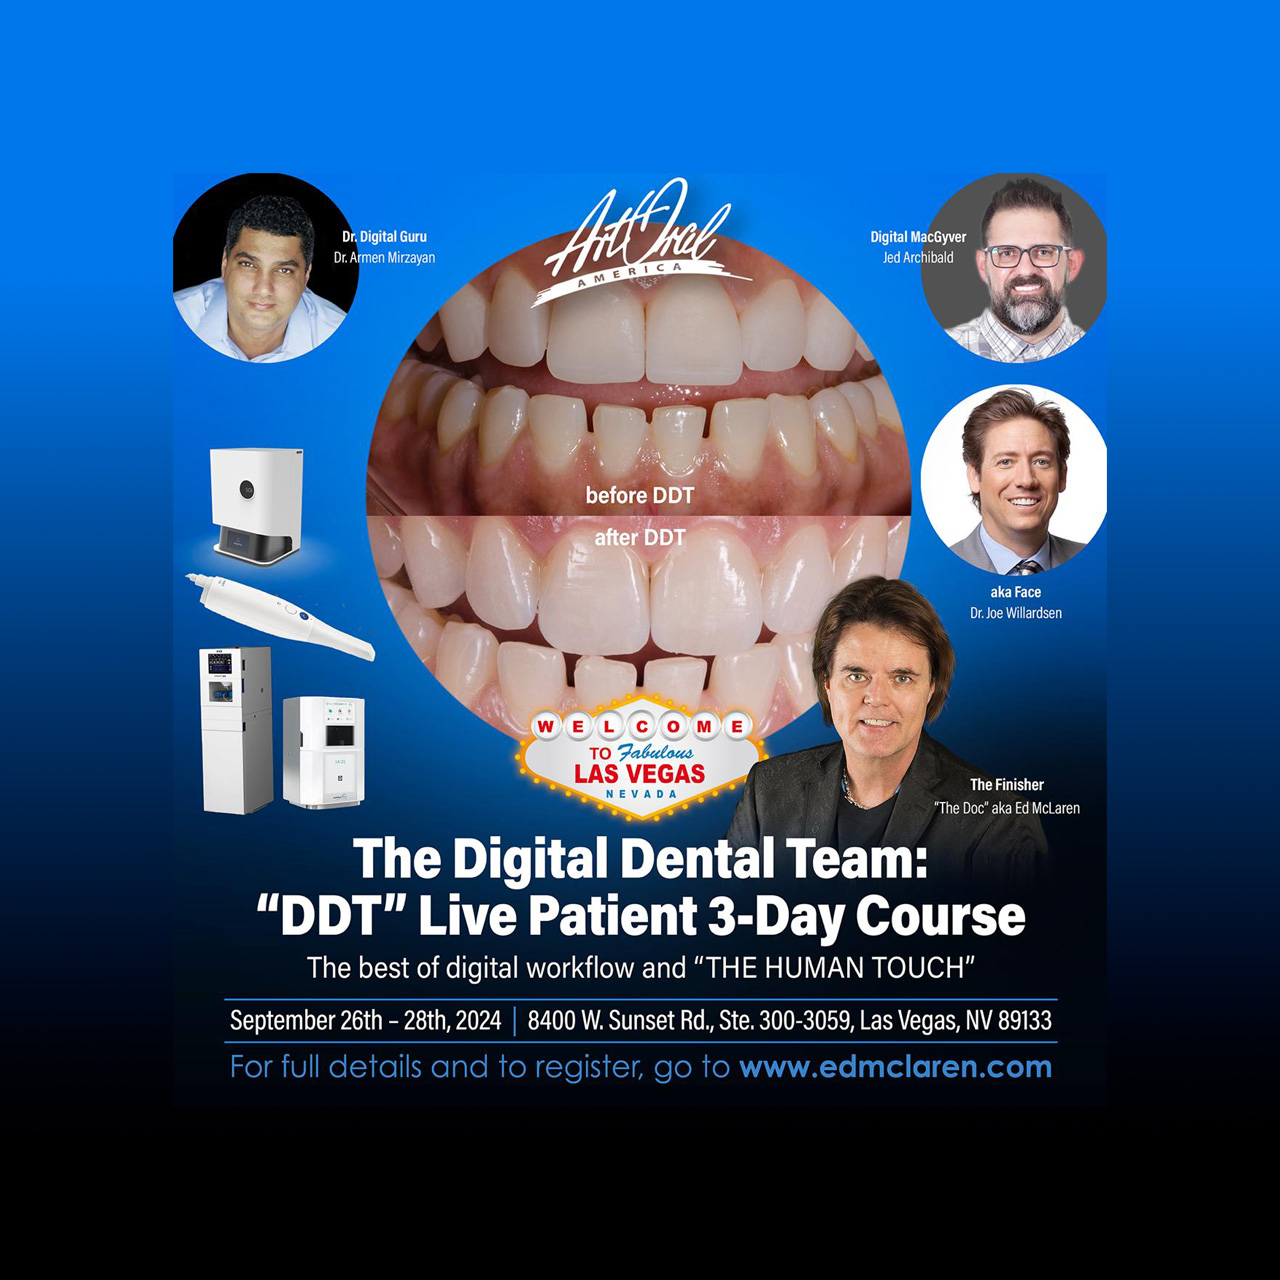
Digital Dental Team – Live Patient (Dentists) (September 26th to 28th)
in Las Vegas, Nevada. USAbout this course
COURSE OVERVIEW
Thursday 26, Friday 27 and Saturday 28
An A TO Z Course including Lectures, Live Patient Demonstrations, and Hands-on Lab Sessions. This course will cover current technologies and thinking on how best to incorporate digital workflow and technology and the “human artistic touch” into a high-end ceramic result for the patient. A patient will be taken from beginning to final delivery in 3 days, participants will do all the procedures in simulation mode and also digitally fabricate 4 incisors for the patient and have an opportunity to try in their work.
COURSE OBJECTIVES
At the end of this course, each participant will understand and be able to:
- Understand and Practice preparation guidelines for Cad-Cam specific preparations
- Operate and capture images using Chairside Scanner for dentists and Laboratory scanner for technicians with the application of materials used for ideal image capture.
- Understand the difference between a good scan and a great scan.
- Learn how to design anterior veneers.
- Understand how to print, invest and press veneers
- Learn how to do micro texture, painting, and finishing techniques. Customize esthetic restorations correctly shaded using minimal porcelain layering techniques.
- Step by step adhesive technique of one veneer
*Certificates of Completion will be provided.
FULL COURSE DESCRIPTION
In this ever-expanding digital dental world, it is now possible for any size lab to offer one day turn around on simple cases, but generally 2 to 3-day turn-around time for anterior (or posterior) world class indirect ceramic veneer restorations that is just not possible with analog technology alone or with current chair side technology alone. With new scanners, and Laboratory 4 and 5 Axis milling machines, state of the Art printers it is possible for a dentist to prepare an anterior veneer case in the morning and have the case delivered in the afternoon with the concept developed by Dr McLaren called the Digital Dental Team. Current Technology allows direct scanning of preparations, or for the many dentists that don’t own scanners scanning the inside of an impression. Thus, this system allows the dentist to enter the “DDT” workflow conventionally or more ideally digitally.
The second part of the DDT concept is the amazing improvement in digital printers that now rival Type 4 Dental stone. There are several workflow paths that can be taken. For this course the path that will be taken, the master cast and master dies are printed in the same way, veneers are designed in a cad program they are then printed in a castable wax. They are invested in a speed investment and pressed in a high strength glass ceramic. The important part of the Digital Dental team is the high quality of the dense glass ceramics that can be layered, or used full contour. The original Vita material is an excellent material, along with the more recent Empress CAD, they work outstanding for this DDT technique. Lithium Disilicate or Zirconium Reinforced Lithium Silicate can also be used but require extra firings to completely crystallize and which makes it more challenging to do in one day.
For speed investment and pressing of machined wax E.Max has been a market leader, but the course authors still believe strongly in pressable “feldspathic glass” materials e.g. Empress and Vita Blocks. The last part of the DDT concept is what I like to call the “ENAMELIZER” and “FINISHER”. It is the magic that only a talented technician can apply to optimized or make a restoration look real. With for aforementioned technology, the machined veneers can be done very quickly after scanning either preps or impressions. The Enamelizer would take it from there, meaning adding small pieces of porcelain, maybe some color highlights, a “halo”, then a quick fire, the “finisher” would do a quick contour, stain and glaze. Also, possible is to used the materials “monolithic” and put natural texture and then surface paint, glaze, and polish the restoration. This technique can be just as esthetic as the micro-layering technique but can be done in a much shorter time.
So, from this DDT concept a 3-day course has been designed. This hands-on fast paced comprehensive three-day program is designed for both the treating dentist, the digital designer and the technician who will do the “Enamelizing” and “finishing”, i.e. the ‘WHOLE DDT” Join Dr. Ed McLaren DDS MDC, Dr Armen Mirzayan, Jed Archibald for this exciting and fast paced course.
EVENT ADDRESS (Link to Google Maps)
8400 W Sunset Rd Suite 300-3059, Las Vegas, NV 89113, United States
ACCOMODATION OPTIONS NEAR THE EVENT: (Links Included)
FAQ
Comments (0)
8:30 am – 9:00 am – Arrive at Training Facility – Welcome Participants
9:00 am – 9:45 am – Lecture Digital Dental Team DDT Concept (both groups) (Ceramic / Patient) room
Intro to the “DDT” Dentist, Scanning, Design, Machine vs. Printing, Materials, Enamelizer
Intro to digital components i.e. Scanning and Output
Intro to the spectrum of materials and their purpose to maximize the digital experience.
9:45 am – 10:00 am – Break
10:00 am – 11:00 am – Live Patient TAPED Demo of DDT veneer preparations: (both groups): [Ceramic / Patient room] patient present
Dr McLaren with patient present reviews video of actual preparations
Scan demo of 8 and 9 on live Patient by Armen and Send to Jed to design
11:00 am – 12:00 pm – Live Demo actual scan on Patient (GROUP 1 dentists AND Group 2 Technicians) [Ceramic / Patient room]
Prepare for digital final Impression live patient
Scan all prepared teeth and send to Jed to design
BREAK INTO TWO GROUPS
GROUP 1 DENTISTS (Photo Studio lecture room)
12:00 pm – 1:00 pm – Lecture/ Demo Scanning Techniques (model similar to patient)
Review of scanning aspects and DATA acquisition and Digital workflow
GROUP 2 TECHNICIANS (Design Room)
12:00 pm – 1:00 pm Lecture/ Demo Scanning Techniques/ Digital Lab Flow
1:00 pm – 2:00 pm – Lunch
GROUP 1 DENTISTS
2:00 pm – 3:00pm – Hands-On Scanning Techniques (model similar to patient) (Photo Studio lecture room)
Dentist group
Scanning techniques
Accurate image acquisition – good scan / best scan
Scanning a veneer case:
Diagnostic wax-up – when/if necessary
GROUP 2 TECHNICIANS
2:00 pm – 3:00 pm – Design Deep Dive (fun and flexible) (wet / milling room)
Get models producing
Review Veneer designing
Parameters and settings
Design toolboxes; edit, drop, shape, etc.
Review Virtual model – manipulating multiple images and designs
3:00 pm – 4:00 pm – Presentation by Shera Gmbh (Ceramic room or Design room)
4:00 pm – 4:15 pm – Break
4:15 pm – 4:45 pm – Lecture: Dr McLaren and Jed: Critical aspects of selection and use of Digital Materials
BREAK INTO TWO GROUPS
GROUP 1 DENTISTS
4:45 pm – 6:00 pm – Lecture: Dr McLaren’s specialized techniques and requirements for CAD-CAM PREPARATIONS (GROUP 1 Dentists)
Guidelines of tooth preparation
6:00 pm – 7:30 pm – Femo and Hands-ON: specialized techs and requirements for CAD -CAM – PREPARATIONS (GROUP 1 Dentists) [CERAMICS LAB]
Veneer PREP designing: on typodont
GROUP 2 TECHNICIANS (JED)
6:00 pm – 6:45 pm – Demonstration “the Digital Waxup” (WET/ MILLING LAB)
Nuances of 3shape to simplify
Keys to a No Flash temp transfer
Matrix Fabrication Keys
6:45 pm – 7:30 pm – Hands on Digital Wax ups, and Extra (WET/ MILLING LAB)
Make sure each participant knows the setup for success in 3Shape for Digital Wax up. Maybe even design a Wax up from of scan of their own smile.
Great time to review specific needs participant may need with DDT workflow
BOTH GROUPS
9:00 am – 11:00 am – LECTURE: THE FINAL TOUCH: Colorization EPRIME, Micro Texture and Surface Finish (CERAMICS / PATIENT LAB)
11:00 am – 11:15 am – Break
11:15 am – 12:15 pm – DEMO: Micro Texture (CERAMICS/ PATIENT LAB)
12:15 pm -1:00 pm – HANDS-ON: (PART 1): Micro Texture (CERAMICS/ PATIENT LAB)
1:00 pm – 2:00 pm – Lunch
2:00 pm -3:00 pm – HANDS-ON (PART 2 continuation) Micro Texture (CERAMICS/ PATIENT LAB)
3:00 pm -4:00 pm – DEMO: Micro Texture Zirconia (CERAMICS/ PATIENT LAB)
4:00 pm – 4:15 pm – Break
4:15 pm -5:15 pm – HANDS-ON: (PART 3 continuation) Micro Texture and ZR (CERAMICS/ PATIENT LAB)
5:15 pm – 6:00 pm – DEMO: Paint ZR (CERAMICS/ PATIENT LAB)
6:00 pm -7:00 pm – HANDS-ON: Paint ZR (CERAMICS/ PATIENT LAB)
8:30 am – Arrive at Training Facility
BOTH GROUPS
9:00 pm – 10:00 am – Lecture surface painting Ceramic restorations
10:00 pm – 11:00 am – Demo surface painting Ceramic restorations
11:00 pm – 12:30 pm – Hands on surface painting Ceramic restorations
12:30 pm – 1:30 pm – Lunch
1:30 pm – 2:30 pm – participants try in Veneers (CERAMICS/ PATIENT LAB)
BREAK INTO TWO GROUPS
2:30 pm – 3:30 pm – AS DESIRED EDUCATION OPTIONS (CERAMICS / PATIENT LAB)
HANDS-ON, FINISH THE FINAL TOUCH
Dr Mclaren in Ceramic Lab
Micro Texture, Surface Color and Glaze and Surface Finish
(WET/ MILLING LAB)
Jed Lecture “the Art of 3DPrinting”
Jed Lecture “Print N Press”
Jed Lecture “ZirCAD Prime’s”
Hands on Jed
Any of the DDT process
2:30 pm – 3:30 pm – Lecture: Review of Current Adhesion techniques. DEMO AND Hands-On Participants will cement a demo VENEER (CERAMICS/ PATIENT LAB)
3:30 pm – 3:45 pm – Break
BOTH GROUPS
3:45 pm – 6:30 pm – Live Patient Cementation
Dr McLaren will cement the veneers fabricated for the patient
Cementation techniques for the right restoration and preparation
Thin veneers – controlling shades / color (CERAMICS/ PATIENT LAB)
3:45 pm – 6:30 pm – OPTIONAL: Demo Micro Layering Jed
Micro 3D inlay cutback and Preparation of e.max or Prime Esthetic
Micro Layering – Using intense stain and porcelain in small space
Final Finishing – How to seamlessly blend, from Monolithic to Layered areas (WET/ MILLING LAB)